 |
Shifts and attendances
Shifts and attendances are displayed in different colours. The colours show what type of work you will be doing during that shift, with each type of work having its own colour. The meaning of the colours can be found in the Shift ToolTip. |
|
Adding shifts
It’s simple. First, click on the date field in the My Time Calendar.
Here you will see the Add Shifts window. 
In this window, you choose the department, employee job and the shift time.
You have already created your shift. |
|
Edit Shift or Attendance
Click on the shift or attendance you want to edit, you will see the edit shift or attendance window. 
Make your changes, and then click on button Save when you are ready. Also, you can edit by using tooltip icons.
|
|
Add identical shifts
If you are going to add identical shifts, you can save time by clicking on the date field on the top of My Time Calendar. You will see Edit Selected Days window.  You can add as many shift as you want. In the same way you can delete shifts. |
|
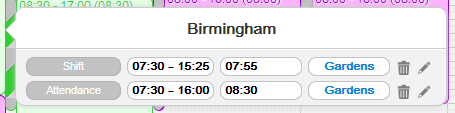
The Shift and Attendance ToolTip The Shift and Attendance ToolTip appears when you hover your mouse over the Shift or Attendance in the My Time Calendar. It gives you information about your shift or attendance hours, number of working hours, job, and department.
You can always get helping by using the Shift and Attendance ToolTip. Using the ToolTip gives you direct access to edit or delete the shift or attendance. It’s make your planning quicker.
|
|
Adding attendances
From The My Time Toolbar choose Advanced Settings > Click Day > Add Attendance, in this way when you will click on a date field in the My Time Calendar you will get Add Attendance window. It enables you to add to employee attendance.
First, click on the date field in the My Time Calendar
Here you will see the Add Attendance window. 
In this window, you choose the department, employee job and the attendance time. You have already created your attendance. |
 |
My Time > The Phase Information
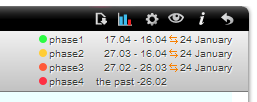
Each date field in My Time Calendar is underlined by one of four colours – green, yellow, orange, and red. The colours means the phase in which you are at the moment.
The length of each phase is up to your company’s preferences. You can read about the Phases on the top right of My Time Filtering Toolbar, there is the Phase Information.
The phases information gives you information about period of time which are dedicated for every phase. The date which is over the time period, next to two arrows icon
In the picture you can see 24 January, it’s day in which all phases will change. It means that employees can plan their schedules till the end of phase 1, so till 24 January. |


|
The Statistic ToolTip
Click on the Down-Arrow Icon on the top of the My Time Calendar to see Statistic ToolTip.  General Credits – The number of hours which an employee is either lacking or in credit for since their first day of employment. This amount can include additional hours that can only be added by admin Duty Hours – The number of obligatory hours the employee is contracted for in each work period.
Action-Balances The job and number of hours the employee will be completing. For example, Winter vacation, On-call, Vacation hours |
|
Full Screen Mode
Click on the Full Screen icon which is on the top-right corner of the screen to switch the full-screen mode.  |