 |
The Report
In the main part of the Reports screen is the report view what you created. In accordance with type of report, in the main part of Report view, you will see content appropriate for each type of report.
For example, the Schedule Report will look like that  |
 |
There are seven types of report, such as Standard Report, Schedule Report, Salary Report, Work Report, Calendar Report, Pocket Calendar Report and Group Reports.
Types of reports: |
Standard Report
The Standard Report contains information about scheduled working hours and attendances. You can organise your data in accordance to your desired outcome.
For example you can create report which will contain: |
|
Sickness hours
The Sickness Hours reports contain information on absence due to illness and the proportion of sick-leave for selected periods, e.g. wage periods, months, quarters or whole years.  |
Sickness per days
The Sickness per days report gives an overview of days taken in sick-leave during selected periods.  |
Holidays
The Holidays report gives an overview of leave taken during the selected period.  |
|
The Schedule Report
The Schedule Report showing a planned shifts. Shifts contains your the working hours, department, and action that you will be doing during that shift. Each type of work having its own colour.
 |
|
You can export the Schedule Report you have created in any file format you would like, such as html, xls or pdf.
The Schedule Report in Portable Document Format (.pdf) format file will look like this  |
|
The Schedule Report in Excel (.xlsx) format file will look like this |

|
Salary Report
The Salary Report it is a periodic statements which show financial position of a company at a given time, or over a stated period, resulting from its business transactions and operations. You can organise your data in accordance to your desired outcome.  |
|
You can export the Salary Report you have created in any file format you would like, such as html, xls, csv or pdf.
The Salary Report in Portable Document Format (.pdf) format file will look like that  |
|
The Salary Report in Comma Separated Values (.csv) format file will look like that |

|
The Calendar Report
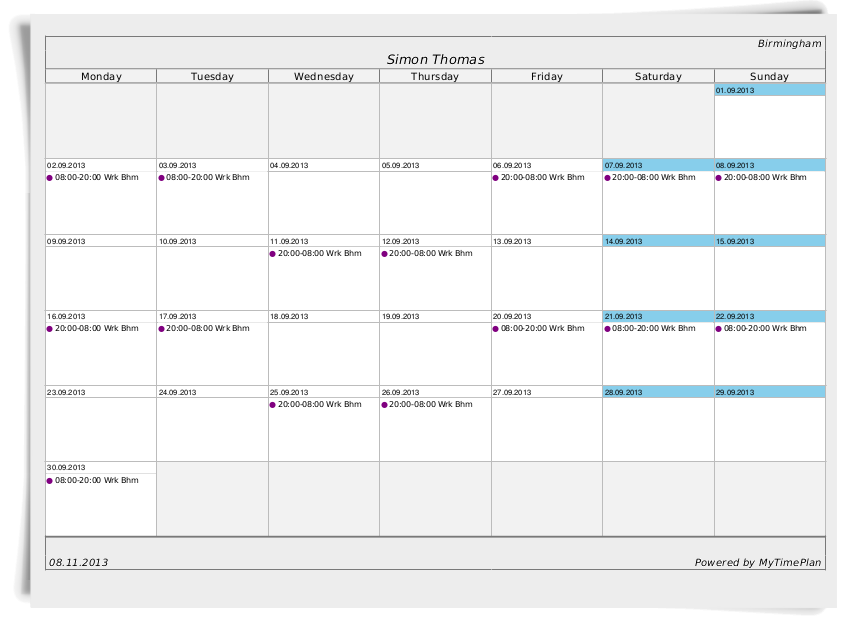
In the Calendar Report you can see your shifts which are displayed as coloured dots. The colours show what type of work you will be doing during that shift, with each type of work having its own colour.
|
|
You can export the Calendar Report you have created in any file format you would like, such as html, xls, pdf, docx, or pptx.
Your Calendar Report in .pdf file format will look like that
 |
|
The Pocket Calendar Report
In the Pocket Calendar Report, you can see the short-hand version of the Schedule Report. You can print it as a credit card sized timetable, which you can then keep in your wallet.
In the Pocket Calendar Report you can see your shifts which are displayed as coloured dots. The colours show what type of work you will be doing during that shift, with each type of work having its own colour.  |
|
You can export a report you have created in any file format you would like, such as html, xls or pdf.
Your Report in .pdf format file will look like this |
The Group ReportThe main idea for group report is that your employer can send you and your co-workers a report which you may be asked to confirm.
The Group Report view is divided into 3 parts: 1. The Group Report Toolbar  |
|
The Group Report Toolbar |
|
Icons of the Group Reports toolbar
|
|
Add Group Report
Click on Add Group Report icon to add new Group Report.  |
|
The Add Group Report window is divided into two sections: General and Employee
GENERAL – set up here time period, name of your repor, choose report type, and confirmation details.
From-To – Choose the time period for which you want to generate a report. Report Name – name of your report Confirmation – marking this option will require your employees to confirm the report Select Report Type – you can specify the type of report you want to generate, such as work report
Confirmation details: Order – click here to set up the ordered queue of confirmation which is based on a specified priority assigned to the employee, group admin and payroll admin when it is added to the queue. Person with the highest priority is always kept at the top of the queue. Ignore Order – mark this field if the order queue of confirmation is not required.
EMPLOYEE – choose here the department for which you want to generate report.
Organizational Tree – in tree diagram choose department for which you want to generate report. All Units – your Group Report will contain selected employees in all departments they work. It is useful when an employee works in more then one department. |
|
The Group Report Filtering Toolbar
The Group Report Filtering Toolbar provides you with options on how you can filter the report that is displayed on your screen. It lets you quickly choose the time period you want to be visible in the Group Report table. |
|
The Group Report Table |
|
From/To – the time period of the Group Report Created Time – the date of creation Name – the name of the Group Report Author – the author of the Group Report Confirmation – informs you of the Yes/No value of whether Report Confirmations are required Generating Status – the number of generated report (it might take a few minutes to generate report). Unconfirmed – the number of reports which are waiting for confirmation Completed – number of confirmed reports All – total number of generated reports View – click on |
|
The Confirmation ReportsThe Confirmation Report page shows the history of both the confirmed and non-confirmed Reports. This page is strictly connected with Group Report view. Double click on the row in the Group Report table, will move you to the Confirmation Report. Every Report is presented separately and contains contact information to employee.
1. The Confirmation Report Toolbar  |
|
The Confirmation Report Toolbar |
|
Icons of the Confirmation Reports toolbar
|
|
Confirmation Report Filtering ToolbarThe Confirmation Report Filtering Toolbar provides you with options on how you can filter the Confirmation Report table that is displayed on your screen. It lets you quickly choose the time period you want to be visible in your report. Other possibility to filter the table it is the employee filter what is showing you the tree view of all employees in your company. Check this department which you want to see in the table. The last way to filter is the status filter, allows to filter the table in accordance with Confirmation Report status, such as All, Waiting for my confirmation, Waiting for confirmation, and Completed. |
 |
The meaning of the status filterAll – displays all reports My Unconfirmed Reports – displays reports which required your confirmation Unconfirmed Reports – displays reports which are non-confirmed Completed – displays reports which are confirmed |
 |
|
The Confirmation Report table |
|
Elements of the Confirmation Report TableFrom-To – the time period of the Group Report
Report Type – the type of generated report, for example work report
Employees – shows the name of the employee for whom reports are generated. If you hover your mouse cursor over the
Status – informs by
View – click on On the bottom of this window there are buttons which allow you to confirm this report as employee, group admin or payroll, download report or see next report.  |
|
Download – click on |
 |
|
Confirm – click on |
 |
|
Related links: |