 |
The Time Filtering Toolbar On the left of the Time Filtering Toolbar, there is the Time Period Filter. You can choose the Time Period that appears in the Time Calendar view, such as Day, Week, Month and Year. |
 |
On the right of the My Time Filtering Toolbar, there is the Stage Information.
The length of each stage is up to your company’s preferences. You can read about the Stages on the top right of the Time Filtering Toolbar, there is the Stages Information.
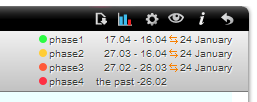
The stages information gives you information about period of time which are dedicated for every stage. The date which is over the time period, next to two arrows icon
In the picture you can see 24 January, it’s day in which all sages will change. It means that employees can plan their schedules till the end of stage 1, so till 24 January.
Each date field in the Time Calendar is underlined by one of four colours – green, yellow, orange, and red. The colours means the phase in which you are at the moment.
Let me quickly remind you about stages. There are four stages in the planning module, and it’s important to know how each one works. In the MyTimePlan schedule and calendar, each date field is underlined by one of four colours, with a different meaning for each. The length of each stage is up to your company’s preferences.
|


Stages
First of all, let’s talk about stages. There are four stages in the Time menu, and it’s important to know how each one works. In the MyTimePlan schedule, each date field is underlined by one of four colours, with a different meaning for each.
Stage 1 – Green – Wishes – Employees put in their wishes regarding working hours and free time down to 6 weeks before the start of the planning period. The only restrictions that each individual has to observe at this stage are the minimum requirements laid down in collective agreements.
Stage 2 – Optimisation by the staff (Yellow) – Six weeks before the start of the planning period, the system automatically moves to Stage 2, in which employees can easily see the shifts that are over- or undermanned. The illustration shows how employees can move themselves from overmanned shifts to undermanned shifts, keeping a degree of control as to how they schedule their time while meeting the demands of the workplace.
Step 3 – Optimisation by the manager (Red) – Five weeks before the start of the planning period, the system automatically moves to Stage 3, in which the manager sees the remaining cases of over- or undermanning and makes the necessary adjustments for optimal results.
Stage 4 – The final shift schedule (Red) – Four weeks before the start of the planning period, the system automatically moves to Stage 4. Your employees’ working hours and free time are now clear, based as far as possible on their own wishes and taking account of the minimum requirements laid down in their collective agreements.
Note: Each date field in the Time Calendar is underlined by one of four colours, with a different meaning for each. |
|
Related Links: |