 |
The Employees List Toolbar
|
 |
Icons of the Employees List toolbar
|
|
ImportThere are two types of data that can be imported in employee tab. The data must be in .txt file and have proper format.
Salary base – to import salary base for employees the data must be: SSN;number of salary entry;value;type; – SSN – SSN number of employee – value – value for salary entry – type – type of value: hour – 0; month – 1; month schedule proportional – 2 Many salary entries can be importet for one user. To add next salary entry just add it after previous one. For example: SSN;number of first salary entry;value;type;number of second salary entry;value;type; abcd Employees – here you can choose which data should be imported into application.
The data in the right window will be imported to database. In .txt file data should be separated by “;” sign. The employee data must contain: – First Name;Last Name;SSN;Hierarchy;Language;Time Zone; Example of .txt file: – John;Smith;12345;management;english;Etc/GMT; If file is made correct there will be window which shows imported data:
To confirm import click on “save” button. If employee data are saved in database the green “birdie” will be displayed next to it. To view imported employees, change filter to: “show all” or “show only unemployed”. |


|
FilterClicking on the Filter icon on the Employee List toolbar will cause that the filtering menu will appear. You can use the filter to display specific records on the Employee List. All you need to do is select on the left column what data would you like to see on your Employee List and move it to right column. Use the small arrows icon to move items. Hold the Shift button on your keyboard to select more items.
|
|
Export listClick on the Export list icon to export your employee data to excel or pdf file. In the Export List window choose orientation (landscape or portrait) and format report type (xlsx or pdf), then select on the left column what data would you like to see on your exported list and move it to right column. Use the small arrows icon to move items. Hold the Shift button on your keyboard to select more items. Click the Generate button when you are done.
|

|
The Exported List in Portable Document Format (.pdf) format file will look like that |

|
The Exported List in Excel (.xlsx) format file will look like that
 |
 |
Add new employeeOn the right is a view of Add new employee
Follow the example here. Note:All fields in Add new employee form can be edited. If you would like to see more or less fields with the employee details, you can change it in Settings > Extra Fields. |
|
Change employee password On the top right of the Employee Page is toolbar where is the Locker Icon. Clicking on that
|

|
Note: Password must contain minimum of 6 characters, include numbers and letters. |
|
General Employee InformationThere are general employee information.
 |
|
Employee ImageTo add your Employee Image, please click Choose File button and upload a photo from your computer. Maximum picture size is 100×100 pixels. Then it looks good on your profile. This picture will be used for your Business Card, as well as can be visible to any of your colleagues.  |
|
AddressAdd here the employee’s address information. The address field is required.  |
|
Contacts Add here your contacts like home and phone number or e-mail address.The mobile and E-mail fields are required.  |
|
Time Zone and Language Select the appropriate Time Zone and Language from drop-down menu. Both of the fields are required.  |
|
Attendance Type
 |
|
HierarchyField is required. Select the employee in the appropriate hierarchy.  |
|
Employee Unit NameYou can change name of employee unit, such as Office, Store, and Account Department. It will be visible in Reports.  |
|
ActionsField is required. Select the employee job.  Note:
If you would like to add more jobs to employee you have to go to Settings > Jobs to add new job. Then go to Settings > Hierarchy to add Job to department branch. |
|
SkillsSelect the employee skills.  |
|
CommentsHere you can leave comments about the employee.  |
|
Save changesClick Save button when you finished adding the employee details. |
|
Extra FieldsAdditional fields to store information that has no other place where it fits. You can create new extra field in Core > Settings > Employment Fields.
|

|
Employee Contracts Here we are adding contract to employee. We can choose contract from drop-down menu which contains the same contract list you created in Reports system > Contract > Contracts List.  Click on Add Contract button to add contract
 In the Add Contract window choose the time period, contract type and unit in needed.
|
|
EmploymentEdit employment details, such as Employment period, Weekly hours, Full time weekly hours, Employment rate, Duty hour’s type and Active Credits. Note: Duty hours type you are define in Settings > Duty Hours  Click on Add Employment button to add employment
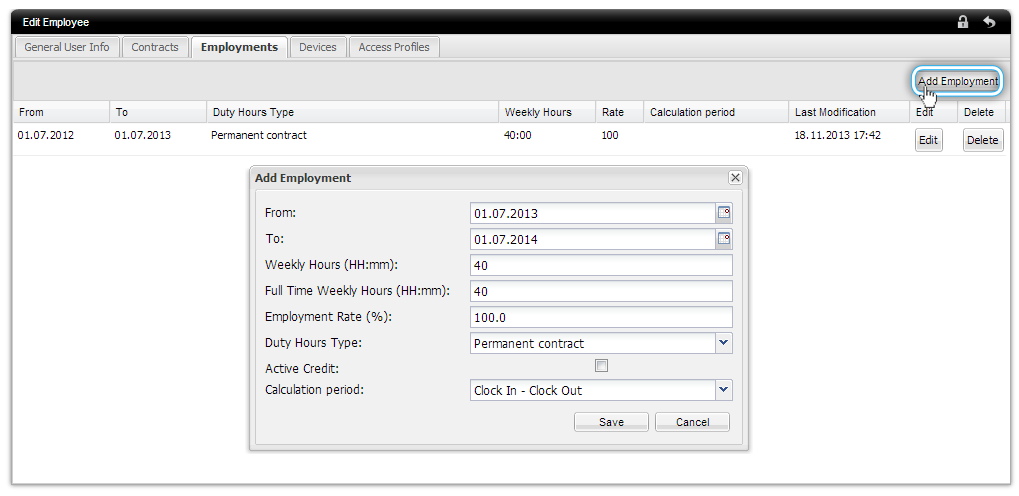 In the Add Employment window select the Employment period, Weekly hours, Full time weekly hours, Employment rate, Duty hour’s type and Active Credits
|
| In the Calculation Period define a rule for time work counting. |
There are four possibilities:
|
 |
|
LockLock date is used to block changes in employees’ data according to salary periods. This feature can be used in two ways:
The Lock date is always end of salary period, even when the end date of report is set to earlier date. The Lock date blocks:
The only things that can be changed in these elements are “end dates” in contracts and employment, if the date in them is after lock date. |
